Posts

Showing posts from 2013

building a storage unit

Image

building a toolshed (ruin)

Image
levelling off the ruin laying concrete blocks 40x20 cm, reinforcing the wall with steel rods 12mm, vertical and horizontal roof construction, steel box 70x40mm, galvanised galvanised sheeting rendering the outside

plasterboards and paella

Image
plasterboards for the ceiling, the walls are plastered with perlita some paella after work

building an extra bedroom

Image
installation of electrics rendering of the outside with sand and cement

building an extra bedroom

Image
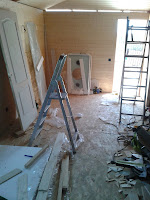
Building of an extra bedroom, we used wooden planks 20 mm for the exterior and 10 mm for the interior. All the walls are insulated and protected with plastic sheeting. shower cubicle complete with radio and water jets. laminate Bijschrift toevoegen here you can see the timber planks in and outside, complete with insulation wooden beams for roof construction installation of double glazed windows after work. finished! another job done The whole job took us 2 weeks, complete with painting varnishing, installation of windows, doors, electrical sockets and switches, laminate floor, installation of hot and cold water, waste pipes , waterheater. ----------------------------------------------------------------------------------------------------------------- make money online

installing a kitchen

Image
installation of a small kitchen unit. installation of a waste pipe just a small kitchen unit. look at the floor tiles, we managed to take out the existing tiles and re use them, and install the waste pipe. after grouting the floor looks like before.

building a sandwich house 1

Image
Because we are going to build a small house in the countryside, we have made a concrete foundation. All the concrete has been mixed with a small mixer because there is no access for a lorry with concrete. The thickness of the concrete is between 12 and 15 cm, the steel mesh is 6 mm thick. All the waste pipes are already been placed, pvc pipes 110 mm. The house is gonna be around 50 square meters and will be made of sandwich panels. I will place more pics when I will start building it.

installing decking

Image
installing decking, plastic. the decking is screwed down on wooden impregnated battens,  a lot of screws !!!

building a wooden sup 2

Image
I have brought the board outside, so you can have a look at the inner structure I am making a lot of progress with my board, my goal is the make a board from leftovers. I know it will be heavier than it should be, but i am saving a lot of weight to cut everything as thin as possible. I also drilled some holes in the ribs. This is the rear of the board, notice that I installed a plug so that later I can ventilate the board. sanding,sanding the fin is also finished, I don't like it as it is.  If I got some more extra time  I would like to add a few more strips to make it bigger. the bottom is also finished, because i don't want to buy any wood all the strips have been cut from leftovers. pfff a lot of work. Here you can see that the bottom isn't all the way flat, towards the nose the board is round.   the more clamps the better, i also used a paint bucket to add some weight to keep the strips in place. building a hollow wooden sup

building an extra bedroom

Image
cavity wall with loadbearing bricks rendering with sand and cement, rustic style almost finished, only need to install the windows